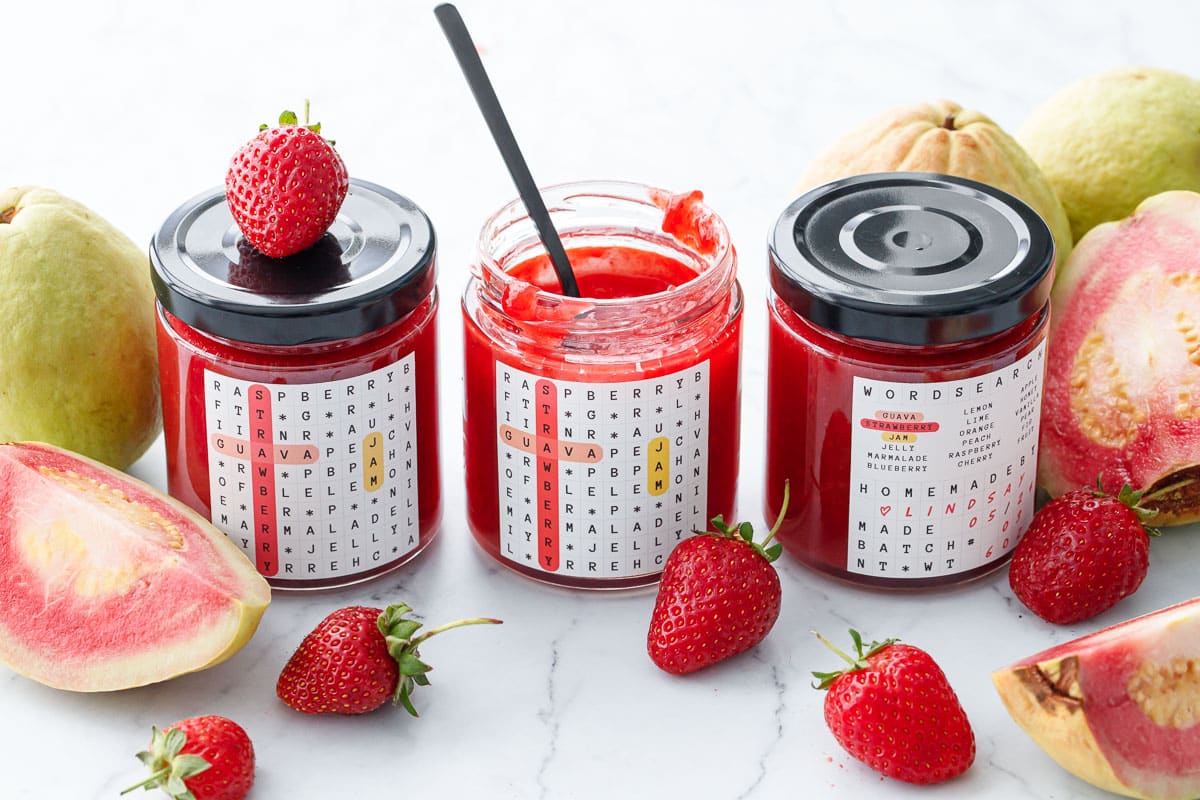
Strawberry and guava come together in one fruit-packed preserve that’s bright, fruity, and vibrant, with a perfect amount of sugar and plenty of acid to make the flavors pop.
The unique pairing of strawberry and guava makes for a truly memorable jam, whether you can it in a water bath for shelf-stable storage, or store it in the fridge or freezer for short term satisfaction (or, you know, eat it by the spoonful straight out of the pot).
Multi-fruit jams are… well, my jam.
Single fruit jams are just so… boring. If you know me, you know I love unique flavor combinations, especially when it comes to my jam recipes. Whether it is the addition of an unexpected flavor, like hibiscus or vanilla bean, basil or even chocolate, a splash of something boozy like limoncello, bourbon or gin, or a hint of heat from habanero or jalapeño.
But more than anything I love mixing fruits and flavors into unexpected fruit combinations. Like mango and raspberry, peach and passionfruit, or blackberry and apple.
But listen, this strawberry and guava jam might just be my favorite fruity combination yet.
Pink guavas have a sweet, musky fragrance with tropical notes of papaya, melon, strawberry and ripe pear… and even a little bit of bubblegum if we’re being honest. Paired with the bright berry flavor of the strawberry the combination is almost candy-like, sweet and bright with the perfect amount of acidity to balance out the sweetness.
Be sure to scroll to the very bottom of the post to download the FREE printable labels, and y’all… I can’t get over how cute these word search labels turned out! Not to mention versatile (I included blank versions so you can color in whatever variety of jam you happen to be making!
Perfect Proportions
You’ll need a total of 3 cups of prepared fruit for this recipe, equal parts mashed ripe strawberries and puréed pink guava.
My first test batch used a 2:1 proportion of strawberry to guava (1 ½ cups mashed strawberry and ¾ cup guava puree), and while it was delicious, I felt the strawberry overpowered the milder guava.
After some adjustments and additional rounds of testing, I ultimately decided that a 1:1 ratio (1 ½ cups of each fruit) was the perfect balance, allowing the flavors of both fruits to shine through without one overpowering the other.
Keep in mind the color of your final jam may vary depending on the color and ripeness of your fruit—my two test batches were very different in color, one much less of a ruby red and more of a soft, mauvey red, purely because the strawberries I used weren’t quite as ripe. My last batch, as you can see in the photos, used incredibly ripe local berries that were deep red all the way through, which gave me a much richer color.
Want More Jam Recipes?
Check out my new cookbook, That’s My Jam, with 52+ seasonal recipes for jams, jellies, marmalades & more!
While you’d be ok adjusting the proportions of this recipe to be more strawberry forward (maybe 2 cups strawberry and 1 cup guava for example), I don’t recommend the reverse, simply because guavas are lower in acid and lower in pectin than strawberries, so the recipe would need more of both to set properly. I tend to use more acid than is generally required as I prefer a brighter, punchier flavor, so more guava should be ok in theory, but it’s not something I’ve fully tested at this time.
Preparing Guavas
I tested this recipe with both raw and cooked guava preparations (simmering the fruit with a bit of water before blending), as well as different consistencies of purees (a coarser one run through the medium screen on the food mill and a smoother one run through the finest screen or a sieve).
I ultimately landed on using raw (uncooked) guavas, pureed in a blender and strained through the finest of my screen food mill—this method proved to be the easiest and quickest, and produced a lovely smooth texture and soft set in the final jam.
Guava skins are edible and contain a ton of vitamin C, which is good, though they can also impart a slightly grassy flavor to the otherwise sweet fruit, so you can peel them first if you want though it’s certainly not necessary. I did not core the fruit either, but if your guavas have a noticeable firm, white core, you can use a spoon or melon baller to scoop it out beforehand along with most of the seeds (which is more work up front but will be easier to strain the puree after blending).
To prepare guavas, cut off stems, then halve and coarsely chop fruit (no need to peel).
Coarsely chop the guava. There’s no need to peel or remove the seeds/cores unless you want to (the seeds will get strained out later).
Transfer chopped guava to a blender or food processor along with 1 tablespoon of lemon juice (to prevent browning).
Transfer pureed guava to a food mill fitted with the fine screen or a fine mesh sieve.
Press guava through the food mill or sieve, removing seeds and bits of skins, until you have about 1 1/2 cups of smooth puree.
To prepare strawberries, mash coarsely chopped fruit with a potato masher. You’ll need about 1 1/2 cups of mashed fruit.
To prepare fresh guavas for jam, toss the coarsely chopped bits of guava into a blender and pulse until smooth. If you have a high-powered blender I recommend keeping the speed fairly low as you don’t want to pulverize the seeds. (Technically guava seeds are edible, however I find them extremely hard—almost tooth-breakingly so—and opted to strain them out entirely.)
Once the guava puree is mostly smooth (there will still be visible bits of green skins and seeds), then strain it through a fine mesh sieve or, preferably, the fine screen of a food mill. I prefer a food mill for this tool, as it’ll give you a better yield and a saucier texture, even with the fine screen. I also find it much easier to process a large amount of fruit compared to a fine mesh sieve which seems to take forever to press all the pulp through. If you have a saucer or juicer with a sauce screen (coarser than you’d use for making juice) that should work here too.
I used fresh pink guavas (that I ordered from Etsy believe it or not), but you can use white or yellow varieties as well—the final jam will just be a more muted color.
There’s also a red variety called, surprisingly, a strawberry guava – if you search for ‘strawberry guava jam’ you’ll probably bring up mostly recipes for this fruit, rather than the combination of strawberries AND guavas that I used here. While I haven’t personally tried strawberry guavas in this recipe (if anyone has a tree and wants to send me some, I’d love you forever), but I imagine you can use them in place of the pink ones just fine (then you would have strawberry guava strawberry jam I guess?)
Fresh vs Frozen fruit
You can most definitely use frozen fruit for this recipe! Freezing fruit is a great way to quickly preserve the best, ripest fruit for later use, if you don’t have time to make your jam the same day you go strawberry picking, for example, or if your guavas happen to be ripe before the strawberries come in.
While it’s totally fine to use frozen fruit here, keep in mind you are more likely to see a little fruit separation/fruit float in the final processed jars (that’s because the ice crystals break the cell walls of the fruit, same reason that thawed fruits tend to be much softer and also leak juice when thawed). This was most noticeable when I used frozen strawberries, but the frozen guava performed remarkably well.
If you don’t have a guava tree (and color me jealous if you do) you can sometimes find frozen guava pulp in international grocery stores (Goya sells a product that I’ve seen locally at Kroger) or online (Tamarin fruit is the brand I’ve used before, for frozen passion fruit as well). Just be sure you’re getting 100% guava pulp or puree, not nectar, and ideally one that’s unsweetened without preservatives.
If using frozen guava, let it thaw completely, then strain through a fine mesh sieve or fine-screen food mill as instructed for a smoother texture (but no blending is necessary). For frozen strawberries, let them thaw (reserving all the juices), then mash as instructed.
I do not recommend using guava juice or nectar in this recipe, as the result would be much too thin to set into a proper jam. The guava pulp has a lot more substance to it than liquid juice.
Pour mashed strawberries into a heavy-bottomed saucepan.
Add guava puree to saucepan along with strawberries. You should have about 3 cups total of prepared fruit.
Add lemon juice, citric acid, and calcium water (included with your pectin pack) into saucepan along with fruit.
Calcium water is made from the packet included with Pomona’s pectin; the calcium is what allows it to set instead of sugar like traditional pectin.
Stir to combine, then bring fruit to a full rolling boil (be cautious of hot splatters).
In a small bowl, combine Pomona’s pectin and granulated sugar.
Whisk pectin into granulated sugar until evenly distributed (this will allow the pectin to dissolve evenly).
Pour sugar-pectin mixture into saucepan with boiling fruit.
Stir vigorously until sugar is completely dissolved and mixture returns to a full boil.
Add butter if desired to reduce foaming; you can also skim the skum from where it collects around the edges of the pan.
Pour hot jam into washed and sterilized canning jars, leaving 1/4-inch of a headspace (a jar funnel helps pour the jam more cleanly).
Wipe the rims of the jam jars to ensure they are completely clean (dirty rims could prevent the jars from sealing properly).
Lower jam jars onto a rack in a large canning pot (water should cover the jars by at least 1 inch).
Cover and bring water to a full rolling boil, then set the timer and process for 10 minutes.
Yes you can can (but you don’t have to).
This recipe is written to be processed in a water bath, preserving for shelf-stable storage for up to a year (some color loss will occur after a few months, as is the case with most red jams, especially those with lower sugar, but that’s totally normal).
That said, you don’t have to can it, in fact, pretty much any of my many jam recipes can be stored in the refrigerator for up to 2 weeks or the freezer for up to 6 months. Instead of processing in a water-bath, just transfer your hot jam to washed and sterilized glass jars with lids, let cool for about an hour (so it doesn’t raise the temperature or your freezer too much), then refrigerate or freeze.
If you’ve never tried water-bath canning before and want to learn, my cookbook is a great resource to get started. I also have a canning 101 post with a blueberry jam recipe from a few years back that outlines the basic equipment and steps you need to get started. Trust me that it is not nearly as intimidating as it sounds! You can (can) do it!
Gimme Some Sugar
Because this recipe is made with Pomona’s pectin (a unique type of pectin that relies on calcium, rather than sugar, to set) the sugar can be safely reduced or replaced with honey or other sugar substitutes. See Pomona’s FAQ page for more information on reducing sugar and using sugar substitutes.
Keep in mind that jams with very low amounts of sugar will discolor much more quickly, as sugar acts as a preservative in jam recipes like this one. In red-colored jams in particular, the color loss will be much more noticeable the less sugar you use.
To adapt this recipe for other brands of pectin, follow the quantities and instructions on your pectin box insert for a basic strawberry jam (with a bit of extra acid to account for the lower acidity of the guava). Different brands of pectin will have slightly different processes (adding the pectin before or after the sugar for example), so you want to be sure to follow the instructions for your specific brand. Other brands of low sugar pectin will not require the calcium water either.
Make the Flavors Pop
I like my jams on the bright side, so there is significantly more acid in here than is technically needed for the jam to be safe for waterbath canning. But I think the acid, in addition to making it safe for preservation, also brightens and brings out the candy-like flavors of the fruit.
In place of the citric acid you can use an additional 1 tablespoon of lemon juice; conversely you can replace some/all of the lemon juice with more citric acid as well (1 tablespoon lemon juice = 1/4 teaspoon powdered citric acid). Citric acid will give the jam a more neutral flavored acidity than lemon juice which does impart some of its own flavor.
Strawberry & Guava Jam
Cook Time: 20 minutes minutesTotal Time: 1 hour hour
Strawberry and guava come together in one fruit-packed preserve that’s bright, fruity, and vibrant, with a perfect amount of sugar and plenty of acid to make the flavors pop.
Cook ModePrevent your screen from going dark
Fill a large stock pot or canning pot 2/3 full with water; place a rack of some sort in the bottom and place over medium-high heat. Wash/sterilize your jars and submerge in water bath as it heats. The pot should be just about boiling by the time the jam is ready to go. Keep jars in hot (not boiling) water until ready to use. This recipe can also be stored in the fridge or freezer if you don’t want to deal with canning it.To prepare guavas, remove stem and blossom ends. Coarsely chop, then transfer to a blender along with lemon juice. Puree on low speed (especially if you have a high speed blender, you don’t want to pulverize the seeds) until smooth. Press puree through a fine mesh sieve or run through the fine screen of a food mill to remove seeds and skins. You should have about 1 1/2 cups of guava puree.Lightly mash strawberries with a potato masher. You should have about 1 1/2 cups of mashed berries. You can opt to run the strawberries through the blender/food mill with the guavas if you like, just know your final jam will be smoother and looser.Pour guava puree and mashed strawberries into a large, heavy saucepan, along with lemon juice, citric acid, and calcium water. Bring to a full rolling boil, stirring occasionally.In a bowl, whisk together sugar and pectin until evenly incorporated.Whisk in sugar/pectin mixture, stirring continuously until mixture returns to a full rolling boil. Add butter if desired to reduce foam, you can also skim off any excess foam from the edges of the pan.Ladle jam into hot jars, leaving 1/4-inch of head space. Wipe jar rims and screw on lids. Process in boiling water for 10 minutes, then transfer to a wire rack to cool completely. Check seals. Any unsealed jars should be refrigerated and used within 3 weeks.
* Calcium powder to make calcium water is included with the Pomona’s brand pectin, other brands of pectin will not require this.
** This recipe requires a low sugar pectin. If using a brand other than Pomona’s, please follow the basic strawberry or guava jam recipe and instructions inside your pectin package, paying attention to the order in which the ingredients are added and the proportion of fruit to sweetener recommended.
All images and text © for Love & Olive Oil.
Free Printable Labels
Ok, but aren’t these labels the greatest? I spent far too many hours putting together this word search, but I absolutely adore how it turned out. There are 18 different jam-related words in there… can you find them all? Every letter will be used at least once.
The free PDF download includes two pages of labels, one with the guava strawberry jam highlighted, and another page with blank labels for you to fill out yourself (there’s also an answer key)… a “choose your own adventure” style label, if you will. Included fruits and flavors include strawberry, raspberry, blueberry, guava, lemon, lime, orange, peach, raspberry, cherry, apple, pear, and fig, plus extras like honey, fruit, and vanilla, and the words for jam, jelly, and marmalade.
Or you can buy the customizable version and change the text, colors, and more! Choose from Canva (works with the Free account!), Photoshop or Illustrator formats.
Free PDF Download
Enter your email address below to instantly download a convenient PDF file, ready for printing!
Editable Template
Want to customize these labels to suit your exact needs? Buy the editable label template and you can personalize text, change colors, and more! Choose from Photoshop, Illustrator, or Canva formats.
There may be affiliate links in this post. We are a participant in the Amazon Services LLC Associates Program, an affiliate advertising program designed to provide a means for us to earn fees by linking to Amazon.com and affiliated sites.
