Jump to Recipe – Print
]]>
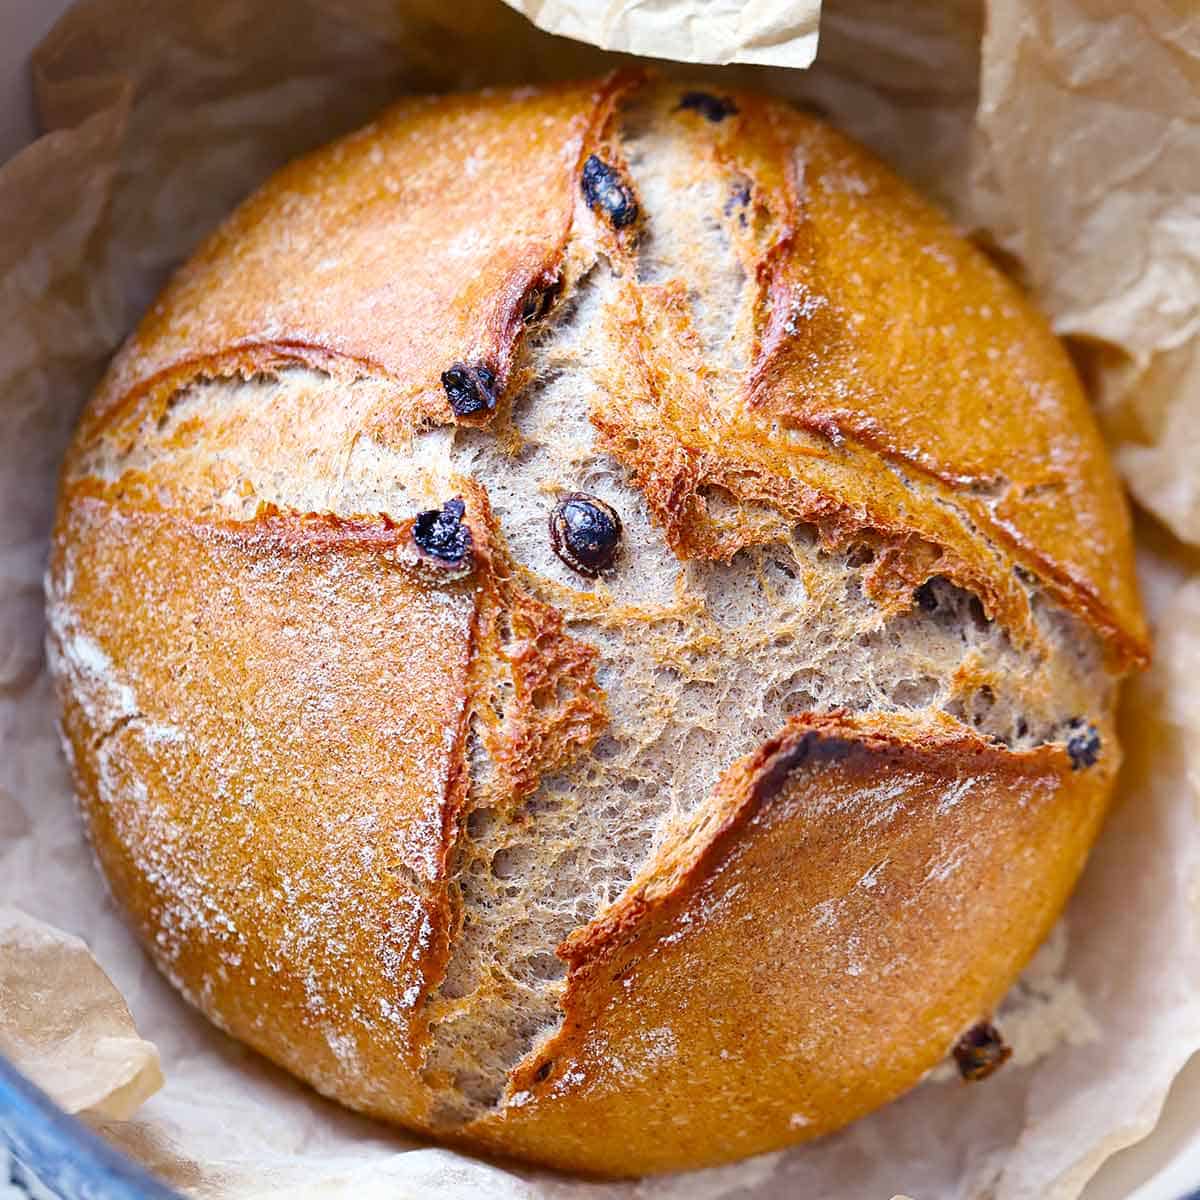
This No Knead Cinnamon Raisin Bread bakes up perfectly in a Dutch Oven with a short, two-hour rise time! A Dutch oven traps the steam inside while the bread bakes, resulting in a tall, fluffy loaf with a perfectly brown crusty crust. This cinnamon raisin version adds raisins, rehydrated with warm water to make them extra plump and juicy, with cinnamon and sugar mixed directly into the dough. It couldn’t be easier to make, even for beginner bakers!
The basic recipe for Dutch Oven No Knead Bread has consistently been Bowl of Delicious’s most popular recipe for years now, and for good reason! My super detailed, fast, easy, and hands-off approach yields an amazing result every time.
You all have been asking for variations on the basic recipe for a while now, so here you are! I’m wicked excited about this cinnamon raisin version of my crusty artisan no knead bread recipe.
In this recipe, the raisins are rehydrated with warm water before adding to the dough, making them more plump and moist. Any raisins on the surface of the bread won’t dry out with baking. The dough also has a little sugar in it, making it slightly sweet but not too sweet (with the option of adding more sugar if you wish). I also added a little more flour than my original basic no knead bread recipe to account for the added moisture from the raisins and to give the bread more structure with the extra ingredients.
You’ll love smelling this warm, aromatic bread as it bakes in the oven. It’s perfect for breakfast as toast, as a snack slathered in butter, or even used for French toast!
Ingredients and Substitutions
Yeast – I use active dry yeast. You can use instant or rapid rise, keeping in mind that it may take a shorter time to rise to double the volume, so keep an eye on it!
Warm water – heated to 100 – 110 degrees F. The temperature is very important in order to activate the yeast but not kill it.
Sugar – This sweetens the bread and also gives the yeast a head-start, since they love to eat sugar and multiply like crazy!
Raisins – you can use regular or golden. You can also use another dried fruit of a similar size, like cranberries, or chopped figs or dates, or a mix if you like. More on variations of flavors below.
Cinnamon
All-purpose flour – I exclusively use King Arthur brand. Other brands may yield different results. You can use bread flour and/or part whole wheat flour if you like but you may need to add a little more water (more on this below).
Fine grain salt – I use fine grain sea salt. But any fine grain salt will do.
How to make cinnamon raisin no knead bread in a Dutch oven
1. Proof the yeast and rehydrate the raisins.
First, mix the yeast with some warm water and sugar in a large bowl or the bowl of a standing mixer. Let the mixture sit for about 10 minutes, at which point the yeast will have fed on the sugar and multiplied, resulting in a foamy surface and about double the volume. (Note: if the mixture does not do this, then your yeast is dead or the water was too hot, and you should get another batch of yeast or try again.)
Yeast mixed with warm water and sugar will foam up and expand after 10 minutes.
Meanwhile, soak the raisins in warm water and allow them to sit for about the same amount of time, allowing them to rehydrate and plump up.
2. Mix the dough and allow to rise.
Then, add the cinnamon, salt, soaked raisins plus the water they soaked in, and flour to the yeast and water mixture. Mix thoroughly for at least a minute, using the standing mixer or a sturdy wooden spoon. If you can go longer, with a standing mixer or if you want a great arm workout, please do. This will yield a stronger dough as the gluten develops more with more vigorous and lengthy mixing.
Gather the dough in the same bowl or transfer to another bowl to the bottom, scraping down the sides to form a cohesive shape. Cover the bowl with plastic wrap and allow to rise, preferably in a warm place (see below for tips on this) until doubled in size, for about 2 hours.
At this point, if you like, you can refrigerate the dough for up to 7 days and bake when you are ready. A cold dough has some benefits, as it is easier to shape and form, and the longer the dough sits the more developed in flavor it will be. Or, you can bake immediately!
The bread dough before and after rising for two hours, doubled in volume.
3. Shape and score the dough
Transfer the dough GENTLY to a floured surface, either the counter or parchment paper, and shape the dough into a round or oval loaf shape. There are many different ways to shape dough, so you can do what you’re comfortable with. If you’re a beginner, my no knead basic bread recipe goes over an easy hands-off approach using parchment paper and a spatula to shape it.
The biggest thing here is not to handle the dough too much or too vigorously. If you smush it around too much, the air pockets will deflate, and you want as many air pockets as possible to create a high, fluffy loaf.
Once it’s shaped, place it into the center of a lightly floured piece of parchment paper and score the top with a very sharp knife or razor blade or lame, if you have one.
Shape the dough, then score the top to allow steam to escape while it bakes.
4. Bake and cool the loaf
Finally, place the loaf in your Dutch oven, along with the parchment paper. You can just grab the sides of the parchment paper to easily transfer the loaf in. Cover and bake, then uncover and bake for a little while longer for a browned crust.
Bake the loaf in a covered Dutch oven on top of the parchment paper, then uncover until browned for the last few minutes.
And now the hardest part: transfer the loaf to a cooling rack and allow to cool for at least 1 hour for best results. If you slice into it too soon without cooling, it may have a gummy texture. You can do it! It’s worth waiting for this no knead cinnamon raisin bread!
Optional steps
Oil the bowl: To make it easier to get the dough out of the bowl after rising, you can transfer the dough to a lightly oiled bowl. This will help the dough not stick to it and be easier to get out when it comes time to shape it.
Preheat your Dutch Oven: Approximately 30 minutes before the dough is done rising, place your Dutch Oven, covered, into your oven as it preheats to 450 degrees. Keep it in there until you’re ready to use it. The added heat will help kickstart baking the loaf, and may result in a taller, fluffier loaf. If you do this, BE CAREFUL HANDLING THE HOT DUTCH OVEN! It will be extremely hot and it’s easy to forget to use potholders to touch the lid to cover it when it’s time to bake the loaf. POTHOLDERS. FOR THE LOVE OF ALL THAT IS GOOD AND HOLY!
Add ice cubes: Dropping a couple of ice cubes into the Dutch oven between the layer of parchment paper and the interior surface of the pot before covering and baking will help create more steam in the Dutch oven. This will help the bread get taller and rise well while baking.
Tip: the type and brand of flour is important!
I almost exclusively use King Arthur all-purpose flour for this no knead cinnamon raisin bread recipe. That brand is extremely reliable in its consistency and quality, especially when it comes to gluten (protein) content. Gluten is important for forming dough strength in this kind of bread. If there isn’t enough gluten, the dough may not hold together as well (it may be runny or too sticky to shape) and the loaf may not bake up as tall/fluffy. I’ve had readers make my basic no knead bread with other brands such as Pillsbury with poor results.
Can I use bread flour or whole wheat flour for this no knead bread?
Both bread flour and whole wheat flour tend to be “thirstier” than all-purpose flour. This means you may have to add a little extra water to the dough.
For whole wheat flour, I recommend only substituting 1 cup of the white flour for whole wheat. Whole wheat flour is very dense and lower in gluten, and can be very difficult to bake with especially for beginner bakers.
Other flavor variations
If you want to mix up the flavors of this no knead bread, here are some that will work that are similar to cinnamon raisin!
Cranberry orange: omit the cinnamon, substitute the raisins for cranberries, and add the zest of an orange to the dough mix.
Fig and rosemary: omit the cinnamon, chop up dried figs as a substitute for the raisins, and add 1-2 tablespoons of chopped fresh rosemary to the dough.
Mixed fruit and nut: use cinnamon and nutmeg in the dough, and use a combination of different dried fruits (raisins, cranberries, chopped apricots, etc.) along with about a half a cup of chopped nuts, such as walnuts, pecans, and/or almonds in the dough.
Other homemade bread recipes
Aside from the OG no knead basic bread recipe this cinnamon raisin bread is derived from, here are some of my other favorite homemade bread recipes!
Did you know commenting and rating recipes is one of the best ways you can support your favorite food bloggers? If you made this recipe or have a question, please click the stars below to comment and Rate this Recipe and/or share photos on social media using the hashtag #bowlofdelicious or tagging @bowlofdelicious!
No Knead Cinnamon Raisin Bread (Dutch Oven)
This no knead cinnamon raisin bread is easy and fast, with a short two-hour rise time, and baked in the Dutch oven for a perfectly crusty crust and fluffy texture inside!
]]>
Save this Recipe Saved!
Print
Pin
Rate
Course: BreadCuisine: American
Prep Time: 5 minutes minutesCook Time: 40 minutes minutescooling time: 1 hour hourTotal Time: 45 minutes minutes
Servings: 8 servings
Calories: 256kcal
Author: Elizabeth Lindemann
]]>Cook ModePrevent your screen from going dark
Ingredients1 ½ cups water 2 ¼ teaspoons active dry yeast (one packet, see notes)2 tablespoons sugar more if you want it extra sweet¾ cup raisins1 tablespoon cinnamon½ tablespoon fine grain salt 3 ½ cups all-purpose flour see notes, plus more for dusting/shaping
InstructionsMicrowave the 1 ½ cups water until it’s 100 degrees F – 110 degrees F (this takes one minute on high in my microwave). In a large bowl or the bowl of a standing mixer, mix 1 cup of the warm water with the 2 ¼ teaspoons active dry yeast and 2 tablespoons sugar and stir until everything is dissolved. Allow to stand for 10 minutes, after which the yeast should have started multiplying resulting in the mixture foaming up to about double its size. Meanwhile, pour the remaining ½ cup of warm water over the ¾ cup raisins in a small bowl and mix together and allow to sit for 10 minutes. This will rehydrate the raisins a bit and make them plumper and softer.Add the raisin and warm water mixture, the 1 tablespoon cinnamon, the ½ tablespoon fine grain salt, and the 3 ½ cups all-purpose flour to the bowl with the water yeast mixture. Mix using a dough hook on the standing mixer, or with a sturdy wooden spoon if mixing by hand, for at least 1 minute, until all the ingredients are well combined. (If using a standing mixer or you want a great arm workout, mix for longer, which will develop more gluten and result in a stronger dough).Gather the dough at the bottom of the bowl by scraping the sides down. Cover the bowl with plastic wrap or a damp towel and allow to rise in a warm place for about 2 hours, or until the dough has doubled in size (see notes for recommendations on warm places to allow dough to rise. At this point, if you like, you can refrigerate the dough for up to 7 days and bake when you are ready. A cold dough has some benefits, as it is easier to shape and form, and the longer the dough sits the more developed in flavor it will be. Or, you can bake immediately!) Optional: during the last 30 minutes of the dough rising, preheat your Dutch oven by placing it, covered, in your oven while it preheats to 450 degrees F. This isn’t entirely necessary but the extra heat will give the dough a bit of a boost when it comes to how tall and fluffy it comes out.Carefully and gently transfer the dough to the edge of a piece of parchment paper that has been sprinkled with a dusting of flour (or on the counter, depending on how you want to shape it). Shape the dough into an oval or circular loaf shape (see notes for tips on shaping). Score the top of the loaf with a sharp knife or razor blade. Using the parchment paper, transfer the loaf AND the parchment paper into the Dutch oven. If you preheated the Dutch oven, be very careful doing this as it will be very hot, and do NOT FORGET to grab the lid using potholders, for the love of all that is good and holy. Optional: If you want, you can place a couple of ice cubes on the side of the Dutch Oven in between the parchment and the side of the pot. This will melt and create more steam as it bakes, but it’s not 100% necessary.Place the lid on the Dutch oven and bake at 450 degrees F for 35 minutes. Then, uncover and bake for another 5-10 minutes, until nice and brown on top. Remove loaf (CAREFULLY!) from the hot Dutch Oven and place on a cooling rack. Ideally, wait for one hour minimum before slicing into it, otherwise the texture may be a bit gummy if it’s too hot when you cut into it.
Notes
To make it a bit easier to remove the dough from the bowl after rising, you can transfer it to another lightly oiled bowl after it’s all mixed together.
Using instant or rapid rise yeast may result in a faster rise time, so keep an eye on the dough so it doesn’t over-proof.
I almost exclusively use King Arthur all-purpose flour. Other flour brands may yield different results. For example, some readers have commented that using Pillsbury AP flour yields results in which the dough is too sticky/runny. This is because different brands may have different or unreliable gluten amounts.
You can use bread four and/or part whole wheat flour for this recipe. Both of these flours are “thirstier” than all-purpose flour, so you may need a bit more water to account for more absorption. I do not recommend substituting all of the flour for whole wheat, especially if you are a beginner baker, as whole wheat flour is much more dense and heavy with less gluten and may result in a very dense loaf of bread. When I use whole wheat flour in this, I substitute 1 cup of the AP flour for whole wheat with good results.
Super hard, tough bottom crust? Next time, try putting a baking sheet on the bottom rack of the oven. It will help divert some of that high heat away from the bottom of the Dutch Oven as it bakes.
Since cold dough is easier to handle, you can place the dough in the fridge for 30 minutes or so after the two hour rise time, just before baking, so it’s easier to scrape out and form.
Dutch Oven Size: I use my oval 5.5 qt. Dutch Oven or my 6 qt. round Dutch Oven for no knead bread recipes. There is some wiggle room, so you can go a little smaller if you like, especially if the parchment paper comes up the sides to prevent sticking. And you can definitely go bigger if you want.
Parchment paper trick: crumple up the parchment before using it, to help it mold to the shape of the Dutch oven better.
Letting the dough rise in a warm humid environment will result in a faster rise. I like to microwave a mug of water until it’s boiling, then place the bowl with the dough in the microwave with the steamy mug and shut the door. This traps the heat and steam inside. Alternatively, you can let the dough rise in the oven with the light on, which will help create a small amount of heat. Of course, you can let it rise at room temperature, but depending on how cold it is in your house it may take a bit longer to rise.
Shaping the dough: One easy way to do this is: transfer the dough to the bottom part of a floured piece of parchment paper and, using floured hands or a spatula, bring the bottom parts of the dough up to gather at the top, either in a oval loaf shape or circular shape. Then carefully flip with your hands, with a bench scraper, or just by flipping the parchment over to place the dough in the center. For an image that helps explain this process and more tips and tricks for no knead bread, be sure to check out this basic no knead Dutch oven bread recipe!
NutritionCalories: 256kcal | Carbohydrates: 57g | Protein: 6g | Fat: 1g | Saturated Fat: 0.1g | Polyunsaturated Fat: 0.2g | Monounsaturated Fat: 0.1g | Sodium: 442mg | Potassium: 183mg | Fiber: 3g | Sugar: 3g | Vitamin A: 3IU | Vitamin C: 1mg | Calcium: 23mg | Iron: 3mg
Nutrition Information DisclaimerThe provided nutrition information is my best estimate and does not include any added sodium from seasoning to taste, any optional ingredients, and it does not take brands into account. I use an automatic API to calculate this information. Feel free to calculate it yourself using one of these tools:
Very Well Fit Nutrition Information Calculator
